Étape 10 : Electronics

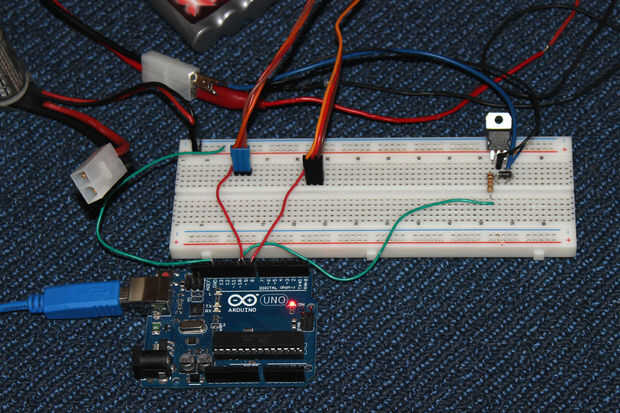
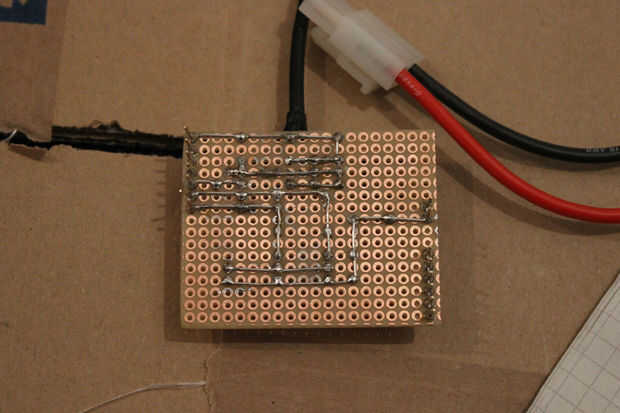

La tension de la batterie relié à vos commandes de moteur de pistolet le taux de décharge. Si vous souhaitez que votre arme à tirer plus vite, n’hésitez pas à utiliser une seconde batterie, ou un avec un taux plus élevé de tension.
Merci beaucoup lo Bob Rudolph pour écrire le code génial pour la mitrailleuse (vous pouvez également le télécharger ici). Il suffit de télécharger les fichiers à votre Arduino. Assurez-vous d’ajuster la position du servo au pistolet !
Code du PSG Arduino :
/* -------------------- Project Sentry Gun -------------------- ============================================================ ----- An Open-Source Project, initiated by Bob Rudolph ----- */ // Set your controller type here // type options: "Arduino_bare", "Shield_v4", "Shield_v6", "Shield_v7", "Standalone_v3", "Standalone_v5", "Standalone_v7", "Standalone_v8" #define type "Arduino_bare" /* Help & Reference: http://projectsentrygun.rudolphlabs.com/make-your-own Forum: http://projectsentrygun.rudolphlabs.com/forum ATTACHMENT INSTRUCTIONS: (for using an Arduino board) attach x-axis (pan) standard servo to digital I/O pin 8 attach y-axis (tilt) standard servo to digital I/O pin 9 attach trigger standard servo to digital I/O pin 10 attach USB indicator LED to digital pin 11 attach firing indicator LED to digital I/O pin 12 attach mode indicator LED to digital I/O pin 13 attach reloading switch to digital I/O pin 3 (low-active: when on, connects pin to GND) attach diable plate momentary button to digital I/O pin 2 (low-active: when on, connects pin to GND) attach electric trigger MOSFET circuit to digital I/O pin 7 adjust the values below to the values that work for your gun: */ // <=========================================================================> // Begin custom values - change these servo positions to work with your turret // <=========================================================================> // servo positions: #define panServo_scanningMin 60 // how far side to side you want the #define panServo_scanningMax 120 // gun to turn while 'scanning' #define scanningSpeed 3000 // total time for 1 sweep (in milliseconds) #define panServo_HomePosition 90 // 'centered' gun position #define tiltServo_HomePosition 90 // #define panServo_ReloadPosition 90 // convenient position for reloading gun #define tiltServo_ReloadPosition 85 // //#define triggerServo_HomePosition 120 // trigger servo not-firing position //#define triggerServo_SqueezedPosition 90 // trigger servo firing position // more trigger settings: #define triggerTravelMillis 1500 // how often should trigger be squeezed (in semi-auto firing) // higher value = slower firing, lower value = faster firing // disable plate settings: #define disablePlateDelay 5000 // how long to disable sentry when plate is pressed (in milliseconds) // ammunition magazine/clip settings: boolean useAmmoCounter = false; // if you want to use the shot counter / clip size feature, set this to true int clipSize = 100; // how many shots before the gun will be empty and the gun will be disabled (reload switch resets the ammo counter) // <=========================================================================> // End custom values // <=========================================================================> int panServoPin; // Arduino pin for pan servo int tiltServoPin; // Arduino pin for tilt servo //int triggerServoPin; // Arduino pin for trigger servo, or output to trigger MOSFET int firingIndicatorLEDPin; // Arduino pin for firing indicator LED int USBIndicatorLEDPin; // Arduino pin for USB indicator LED int modeIndicatorLEDPin; // Arduino pin for Mode indicator LED int reloadSwitchPin; // Arduino pin for input from RELOAD switch int disablePlatePin; // Arduino pin for input from disable plate int electricTriggerPin; // Arduino pin for output to trigger MOSFET boolean invertInputs; // TRUE turns on internal pull-ups, use if closed switch connects arduino pin to ground // pin assignments for each hardware setup are set in the function assignPins() at bottom of code typedef struct config_t { // Booleans but int int controlMode; int safety; int firingMode; int scanWhenIdle; int trackingMotion; int trackingColor; int leadTarget; int safeColor; int showRestrictedZones; int showDifferentPixels; int showTargetBox; int showCameraView; int mirrorCam; int soundEffects; // Integers int camWidth; int camHeight; int nbDot; int antSens; int minBlobArea; int tolerance; int effect; int trackColorTolerance; int trackColorRed; int trackColorGreen; int trackColorBlue; int safeColorMinSize; int safeColorTolerance; int safeColorRed; int safeColorGreen; int safeColorBlue; int idleTime; // Floats double propX; double propY; double xRatio; double yRatio; double xMin; double xMax; double yMin; double yMax; } configuration; configuration configuration1; #include <Servo.h> Servo pan; // x axis servo Servo tilt; // y axis servo Servo trigger; // trigger servo int xPosition; // pan position int yPosition; // tilt position int fire = 0; // if 1, fire; else, don't fire int fireTimer = 0; int fireSelector = 1; // 1 - semi-automatic firing, auto/semi-auto gun // 3 - full automatic firing, full-auto gun int idleCounter = 0; int watchdog = 0; int watchdogTimeout = 2000; boolean idle = true; boolean scanning = false; boolean scanDirection = true; boolean disabled = false; unsigned long int disableEndTime; int scanXPosition = panServo_scanningMin; int shotCounter = 0; // number of shots fires since last reload boolean clipEmpty = false; // is the ammo magazine empty? byte indicator; // if 'a', continue, if 'z', idle byte x100byte; // some bytes used during serial communication byte x010byte; byte x001byte; byte y100byte; byte y010byte; byte y001byte; byte fireByte; byte fireSelectorByte; byte scanningByte; void setup(){ assignPins(); pan.attach(panServoPin); // set up the x axis servo pan.write(panServo_HomePosition); tilt.attach(tiltServoPin); // set up the y axis servo tilt.write(tiltServo_HomePosition); pinMode(electricTriggerPin, OUTPUT); // electric trigger, set as output digitalWrite(electricTriggerPin, LOW); // trigger.attach(triggerServoPin); // servo for trigger, set that servo up // trigger.write(triggerServo_HomePosition); pinMode(USBIndicatorLEDPin, OUTPUT); // set up USB indicator LED pinMode(modeIndicatorLEDPin, OUTPUT); // set up Mode indicator LED pinMode(firingIndicatorLEDPin, OUTPUT); // set up firing indicator LED pinMode(reloadSwitchPin, INPUT); // set up reload switch input pinMode(disablePlatePin, INPUT); // set up disable plate input if(invertInputs) { digitalWrite(reloadSwitchPin, HIGH); // turn on internal pull-up digitalWrite(disablePlatePin, HIGH); // turn on internal pull-up } Serial.begin(4800); // start communication with computer } void loop() { if (Serial.available() >= 10) { // check to see if a new set of commands is available watchdog = 0; indicator = Serial.read(); // read first byte in buffer if(indicator == 'a') { // check for 'a' (indicates start of message) idle = false; idleCounter = 0; digitalWrite(USBIndicatorLEDPin, HIGH); // light up the USB indicator LED x100byte = Serial.read(); // read the message, byte by byte x010byte = Serial.read(); // x001byte = Serial.read(); // y100byte = Serial.read(); // y010byte = Serial.read(); // y001byte = Serial.read(); // fireByte = Serial.read(); // fireSelectorByte = Serial.read(); // fireSelector = int(fireSelectorByte) - 48; // convert byte to integer scanningByte = Serial.read(); if((int(scanningByte) - 48) == 1) { scanning = true; } else{ scanning = false; } } else if(indicator == 'z'){ // check for command to go idle (sent by computer when program is ended) idle = true; } else if(indicator == 'b'){ // start backup backup(); } else if(indicator == 'r'){ // start restore restore(); } } else{ watchdog++; if(watchdog > watchdogTimeout) { idle = true; } } if(idle) { // when Arduino is not getting commands from computer... Serial.write('T'); // tell the computer that Arduino is here idleCounter++; // periodically blink the USB indicator LED if(idleCounter > 1000) { // sequenceLEDs(1, 100); delay(10); // digitalWrite(USBIndicatorLEDPin, HIGH); // // delay(250); // // digitalWrite(USBIndicatorLEDPin, LOW); // idleCounter = 0; // } // else{ // digitalWrite(USBIndicatorLEDPin, LOW); // } // xPosition = panServo_HomePosition; // keep x axis servo in its home position yPosition = tiltServo_HomePosition; // keep y axis servo in its home position fire = 0; // don't fire } else{ // when Arduino is getting commands from the computer... xPosition = (100*(int(x100byte)-48)) + (10*(int(x010byte)-48)) + (int(x001byte)-48); // decode those message bytes into two 3-digit numbers yPosition = (100*(int(y100byte)-48)) + (10*(int(y010byte)-48)) + (int(y001byte)-48); // fire = int(fireByte) - 48; // convert byte to integer } if(scanning) { digitalWrite(modeIndicatorLEDPin, HIGH); if(scanDirection) { scanXPosition += 1; if(scanXPosition > panServo_scanningMax) { scanDirection = false; scanXPosition = panServo_scanningMax; } } else{ scanXPosition -= 1; if(scanXPosition < panServo_scanningMin) { scanDirection = true; scanXPosition = panServo_scanningMin; } } xPosition = scanXPosition; yPosition = tiltServo_HomePosition; fire = 0; delay(scanningSpeed/abs(panServo_scanningMax-panServo_scanningMin)); } else{ digitalWrite(modeIndicatorLEDPin, LOW); } if((digitalRead(disablePlatePin) == HIGH && !invertInputs) || (digitalRead(disablePlatePin) == LOW && invertInputs)) { // check the disable plate to see if it is pressed disabled = true; disableEndTime = millis() + disablePlateDelay; } if(millis() > disableEndTime) { disabled = false; } if((digitalRead(reloadSwitchPin) == HIGH && !invertInputs) || (digitalRead(reloadSwitchPin) == LOW && invertInputs)) { // check the reload switch to see if it is flipped shotCounter = 0; xPosition = panServo_ReloadPosition; // if it is flipped, override computer commands, yPosition = tiltServo_ReloadPosition; // and send the servos to their reload positions fire = 0; // don't fire while reloading digitalWrite(modeIndicatorLEDPin, HIGH); delay(100); digitalWrite(modeIndicatorLEDPin, LOW); delay(100); } if(disabled) { xPosition = panServo_ReloadPosition; // if it is flipped, override computer commands, yPosition = tiltServo_ReloadPosition; // and send the servos to their reload positions fire = 0; // don't fire while reloading digitalWrite(modeIndicatorLEDPin, HIGH); delay(50); digitalWrite(modeIndicatorLEDPin, LOW); delay(50); } pan.write(xPosition); // send the servos to whatever position has been commanded tilt.write(yPosition); // if(useAmmoCounter && shotCounter >= clipSize) { clipEmpty = true; } else{ clipEmpty = false; } if(fire == 1 && !clipEmpty) { // if firing... Fire(fireSelector); // fire the gun in whatever firing mode is selected } else{ // if not firing... ceaseFire(fireSelector); // stop firing the gun } } void Fire(int selector) { // function to fire the gun, based on what firing mode is selected if(selector == 1) { fireTimer++; if(fireTimer >=0 && fireTimer <= triggerTravelMillis) { digitalWrite(electricTriggerPin, HIGH); // trigger.write(triggerServo_SqueezedPosition); digitalWrite(firingIndicatorLEDPin, HIGH); } if(fireTimer > triggerTravelMillis && fireTimer < 1.5*triggerTravelMillis) { digitalWrite(electricTriggerPin, LOW); // trigger.write(triggerServo_HomePosition); digitalWrite(firingIndicatorLEDPin, LOW); } if(fireTimer >= 1.5*triggerTravelMillis) { fireTimer = 0; if(useAmmoCounter) { shotCounter++; // increment the shot counter } } } if(selector == 3) { digitalWrite(electricTriggerPin, HIGH); // trigger.write(triggerServo_SqueezedPosition); digitalWrite(firingIndicatorLEDPin, HIGH); } } void ceaseFire(int selector) { // function to stop firing the gun, based on what firing mode is selected if(selector == 1) { fireTimer = 0; digitalWrite(electricTriggerPin, LOW); // trigger.write(triggerServo_HomePosition); digitalWrite(firingIndicatorLEDPin, LOW); } if(selector == 3) { // for my gun, both firing modes cease firing by simply shutting off. digitalWrite(electricTriggerPin, LOW); // trigger.write(triggerServo_HomePosition); digitalWrite(firingIndicatorLEDPin, LOW); } } void sequenceLEDs(int repeats, int delayTime) { int startDelay; for(int i = 0; i < repeats; i++) { digitalWrite(USBIndicatorLEDPin, LOW); digitalWrite(modeIndicatorLEDPin, LOW); startDelay = millis(); while(millis()-startDelay < delayTime) { digitalWrite(firingIndicatorLEDPin, HIGH); } digitalWrite(firingIndicatorLEDPin, LOW); startDelay = millis(); while(millis()-startDelay < delayTime) { digitalWrite(USBIndicatorLEDPin, HIGH); } digitalWrite(USBIndicatorLEDPin, LOW); startDelay = millis(); while(millis()-startDelay < delayTime) { digitalWrite(modeIndicatorLEDPin, HIGH); } digitalWrite(modeIndicatorLEDPin, LOW); startDelay = millis(); while(millis()-startDelay < delayTime) { // chill } } } void assignPins() { if(type == "Arduino_bare" || type == "Arduino_Bare") { // pin attachments: panServoPin = 8; // Arduino pin for pan servo tiltServoPin = 9; // Arduino pin for tilt servo // triggerServoPin = 7; // Arduino pin for trigger servo, or output to trigger MOSFET firingIndicatorLEDPin = 12; // Arduino pin for firing indicator LED USBIndicatorLEDPin = 11; // Arduino pin for USB indicator LED modeIndicatorLEDPin = 13; // Arduino pin for Mode indicator LED reloadSwitchPin = 3; // Arduino pin for input from RELOAD switch disablePlatePin = 2; // Arduino pin for input from disable plate electricTriggerPin = 10; // Arduino pin for output to trigger MOSFET invertInputs = true; // TRUE turns on internal pull-ups, use if closed switch connects arduino pin to ground } else if(type == "Shield_v4" || type == "Shield_v6") { // pin attachments: panServoPin = 9; // Arduino pin for pan servo tiltServoPin = 8; // Arduino pin for tilt servo // triggerServoPin = 7; // Arduino pin for trigger servo, or output to trigger MOSFET electricTriggerPin = 6; // Arduino pin for output to trigger MOSFET firingIndicatorLEDPin = 11; // Arduino pin for firing indicator LED USBIndicatorLEDPin = 12; // Arduino pin for USB indicator LED modeIndicatorLEDPin = 13; // Arduino pin for Mode indicator LED reloadSwitchPin = 10; // Arduino pin for input from RELOAD switch disablePlatePin = 2; // Arduino pin for input from disable plate invertInputs = true; // TRUE turns on internal pull-ups, use if closed switch connects arduino pin to ground } else if(type == "Shield_v7") { // pin attachments: panServoPin = 8; // Arduino pin for pan servo tiltServoPin = 9; // Arduino pin for tilt servo // triggerServoPin = 10; // Arduino pin for trigger servo, or output to trigger MOSFET electricTriggerPin = 7; // Arduino pin for output to trigger MOSFET firingIndicatorLEDPin = 12; // Arduino pin for firing indicator LED USBIndicatorLEDPin = 6; // Arduino pin for USB indicator LED modeIndicatorLEDPin = 13; // Arduino pin for Mode indicator LED reloadSwitchPin = 11; // Arduino pin for input from RELOAD switch disablePlatePin = 2; // Arduino pin for input from disable plate invertInputs = true; // TRUE turns on internal pull-ups, use if closed switch connects arduino pin to ground } else if(type == "Standalone_v3") { // pin attachments: panServoPin = 8; // Arduino pin for pan servo tiltServoPin = 9; // Arduino pin for tilt servo // triggerServoPin = 10; // Arduino pin for trigger servo, or output to trigger MOSFET electricTriggerPin = 7; // Arduino pin for output to trigger MOSFET firingIndicatorLEDPin = 12; // Arduino pin for firing indicator LED USBIndicatorLEDPin = 14; // Arduino pin for USB indicator LED modeIndicatorLEDPin = 13; // Arduino pin for Mode indicator LED reloadSwitchPin = 11; // Arduino pin for input from RELOAD switch disablePlatePin = 2; // Arduino pin for input from disable plate invertInputs = true; // TRUE turns on internal pull-ups, use if closed switch connects arduino pin to ground } else if(type == "Standalone_v5") { // pin attachments: panServoPin = 8; // Arduino pin for pan servo tiltServoPin = 9; // Arduino pin for tilt servo // triggerServoPin = 10; // Arduino pin for trigger servo, or output to trigger MOSFET electricTriggerPin = 7; // Arduino pin for output to trigger MOSFET firingIndicatorLEDPin = 12; // Arduino pin for firing indicator LED USBIndicatorLEDPin = 14; // Arduino pin for USB indicator LED modeIndicatorLEDPin = 13; // Arduino pin for Mode indicator LED reloadSwitchPin = 11; // Arduino pin for input from RELOAD switch disablePlatePin = 2; // Arduino pin for input from disable plate invertInputs = true; // TRUE turns on internal pull-ups, use if closed switch connects arduino pin to ground } else if(type == "Standalone_v7") { // pin attachments: panServoPin = 8; // Arduino pin for pan servo tiltServoPin = 9; // Arduino pin for tilt servo // triggerServoPin = 10; // Arduino pin for trigger servo, or output to trigger MOSFET electricTriggerPin = 7; // Arduino pin for output to trigger MOSFET firingIndicatorLEDPin = 12; // Arduino pin for firing indicator LED USBIndicatorLEDPin = 14; // Arduino pin for USB indicator LED modeIndicatorLEDPin = 13; // Arduino pin for Mode indicator LED reloadSwitchPin = 11; // Arduino pin for input from RELOAD switch disablePlatePin = 2; // Arduino pin for input from disable plate invertInputs = true; // TRUE turns on internal pull-ups, use if closed switch connects arduino pin to ground } else if(type == "Standalone_v8") { // pin attachments: panServoPin = 8; // Arduino pin for pan servo tiltServoPin = 9; // Arduino pin for tilt servo // triggerServoPin = 10; // Arduino pin for trigger servo, or output to trigger MOSFET electricTriggerPin = 7; // Arduino pin for output to trigger MOSFET firingIndicatorLEDPin = 12; // Arduino pin for firing indicator LED USBIndicatorLEDPin = 14; // Arduino pin for USB indicator LED modeIndicatorLEDPin = 13; // Arduino pin for Mode indicator LED reloadSwitchPin = 11; // Arduino pin for input from RELOAD switch disablePlatePin = 2; // Arduino pin for input from disable plate invertInputs = true; // TRUE turns on internal pull-ups, use if closed switch connects arduino pin to ground } } Sauvegarde :
// contributed by Hugo K. #include <EEPROM.h> #include "EEPROMAnything.h" /* // Booleans but int int controlMode; int safety; int firingMode; int scanWhenIdle; int trackingMotion; int trackingColor; int leadTarget; int safeColor; int showRestrictedZones; int showDifferentPixels; int showTargetBox; int showCameraView; int mirrorCam; int soundEffects; // Integers int camWidth; int camHeight; int nbDot; int antSens; int minBlobArea; int tolerance; int effect; int trackColorTolerance; int trackColorRed; int trackColorGreen; int trackColorBlue; int safeColorMinSize; int safeColorTolerance; int safeColorRed; int safeColorGreen; int safeColorBlue; int idleTime; // Floats double propX; double propY; double xRatio; double yRatio; double xMin; double xMax; double yMin; double yMax; */ void backup(){ char* Parameter; char* i; char BufferSerie[200]; for (int z=0;z<=200;z++) BufferSerie[z]='\0'; // Save the String Send byte bufferPos=0; char ch; boolean endOfString = false; while( !endOfString){ if(Serial.available()){ ch = Serial.read(); if(ch != '!'){ BufferSerie[bufferPos++] = ch; }else{ endOfString = true; } } } // Split the received String and update the struct configuration."Value" // Booleans Parameter = strtok_r(BufferSerie, ";", &i); configuration1.controlMode = atoi(Parameter); Parameter = strtok_r(NULL, ";", &i); configuration1.safety = atoi(Parameter); Parameter = strtok_r(NULL, ";", &i); configuration1.firingMode = atoi(Parameter); Parameter = strtok_r(NULL, ";", &i); configuration1.scanWhenIdle = atoi(Parameter); Parameter = strtok_r(NULL, ";", &i); configuration1.trackingMotion = atoi(Parameter); Parameter = strtok_r(NULL, ";", &i); configuration1.trackingColor = atoi(Parameter); Parameter = strtok_r(NULL, ";", &i); configuration1.leadTarget = atoi(Parameter); Parameter = strtok_r(NULL, ";", &i); configuration1.safeColor = atoi(Parameter); Parameter = strtok_r(NULL, ";", &i); configuration1.showRestrictedZones = atoi(Parameter); Parameter = strtok_r(NULL, ";", &i); configuration1.showDifferentPixels = atoi(Parameter); Parameter = strtok_r(NULL, ";", &i); configuration1.showTargetBox = atoi(Parameter); Parameter = strtok_r(NULL, ";", &i); configuration1.showCameraView = atoi(Parameter); Parameter = strtok_r(NULL, ";", &i); configuration1.mirrorCam = atoi(Parameter); Parameter = strtok_r(NULL, ";", &i); configuration1.soundEffects = atoi(Parameter); // Integers Parameter = strtok_r(NULL, ";", &i); configuration1.camWidth = atoi(Parameter); Parameter = strtok_r(NULL, ";", &i); configuration1.camHeight = atoi(Parameter); Parameter = strtok_r(NULL, ";", &i); configuration1.nbDot = atoi(Parameter); Parameter = strtok_r(NULL, ";", &i); configuration1.antSens = atoi(Parameter); Parameter = strtok_r(NULL, ";", &i); configuration1.minBlobArea = atoi(Parameter); Parameter = strtok_r(NULL, ";", &i); configuration1.tolerance = atoi(Parameter); Parameter = strtok_r(NULL, ";", &i); configuration1.effect = atoi(Parameter); Parameter = strtok_r(NULL, ";", &i); configuration1.trackColorTolerance = atoi(Parameter); Parameter = strtok_r(NULL, ";", &i); configuration1.trackColorRed = atoi(Parameter); Parameter = strtok_r(NULL, ";", &i); configuration1.trackColorGreen = atoi(Parameter); Parameter = strtok_r(NULL, ";", &i); configuration1.trackColorBlue = atoi(Parameter); Parameter = strtok_r(NULL, ";", &i); configuration1.safeColorMinSize = atoi(Parameter); Parameter = strtok_r(NULL, ";", &i); configuration1.safeColorTolerance = atoi(Parameter); Parameter = strtok_r(NULL, ";", &i); configuration1.safeColorRed = atoi(Parameter); Parameter = strtok_r(NULL, ";", &i); configuration1.safeColorGreen = atoi(Parameter); Parameter = strtok_r(NULL, ";", &i); configuration1.safeColorBlue = atoi(Parameter); Parameter = strtok_r(NULL, ";", &i); configuration1.idleTime = atoi(Parameter); // floats Parameter = strtok_r(NULL, ";", &i); configuration1.propX = strtod(Parameter,NULL); Parameter = strtok_r(NULL, ";", &i); configuration1.propY = strtod(Parameter,NULL); Parameter = strtok_r(NULL, ";", &i); configuration1.xRatio = strtod(Parameter,NULL); Parameter = strtok_r(NULL, ";", &i); configuration1.yRatio = strtod(Parameter,NULL); Parameter = strtok_r(NULL, ";", &i); configuration1.xMin = strtod(Parameter,NULL); Parameter = strtok_r(NULL, ";", &i); configuration1.xMax = strtod(Parameter,NULL); Parameter = strtok_r(NULL, ";", &i); configuration1.yMin = strtod(Parameter,NULL); Parameter = strtok_r(NULL, ";", &i); configuration1.yMax = strtod(Parameter,NULL); delay(20); // Backup on EEPROM 92 bytes, Start on 0 EEPROM_writeAnything(0, configuration1); //take more than 92*3.3ms } void restore(){ EEPROM_readAnything(0, configuration1); // Relode Struct configuration from EEPROM delay(20); Serial.println('R'); // Tel Processing Arduino Ready for Sending Values //Booleans Serial.print(configuration1.controlMode); Serial.print(";"); Serial.print(configuration1.safety); Serial.print(";"); Serial.print(configuration1.firingMode); Serial.print(";"); Serial.print(configuration1.scanWhenIdle); Serial.print(";"); Serial.print(configuration1.trackingMotion); Serial.print(";"); Serial.print(configuration1.trackingColor); Serial.print(";"); Serial.print(configuration1.leadTarget); Serial.print(";"); Serial.print(configuration1.safeColor); Serial.print(";"); Serial.print(configuration1.showRestrictedZones); Serial.print(";"); Serial.print(configuration1.showDifferentPixels); Serial.print(";"); Serial.print(configuration1.showTargetBox); Serial.print(";"); Serial.print(configuration1.showCameraView); Serial.print(";"); Serial.print(configuration1.mirrorCam); Serial.print(";"); Serial.print(configuration1.soundEffects); Serial.print(";"); //Integers Serial.print(configuration1.camWidth); Serial.print(";"); Serial.print(configuration1.camHeight); Serial.print(";"); Serial.print(configuration1.nbDot); Serial.print(";"); Serial.print(configuration1.antSens); Serial.print(";"); Serial.print(configuration1.minBlobArea); Serial.print(";"); Serial.print(configuration1.tolerance); Serial.print(";"); Serial.print(configuration1.effect); Serial.print(";"); Serial.print(configuration1.trackColorTolerance); Serial.print(";"); Serial.print(configuration1.trackColorRed); Serial.print(";"); Serial.print(configuration1.trackColorGreen); Serial.print(";"); Serial.print(configuration1.trackColorBlue); Serial.print(";"); Serial.print(configuration1.safeColorMinSize); Serial.print(";"); Serial.print(configuration1.safeColorTolerance); Serial.print(";"); Serial.print(configuration1.safeColorRed); Serial.print(";"); Serial.print(configuration1.safeColorGreen); Serial.print(";"); Serial.print(configuration1.safeColorBlue); Serial.print(";"); Serial.print(configuration1.idleTime); Serial.print(";"); //Floats Serial.print(configuration1.propX); Serial.print(";"); Serial.print(configuration1.propY); Serial.print(";"); Serial.print(configuration1.xRatio); Serial.print(";"); Serial.print(configuration1.yRatio); Serial.print(";"); Serial.print(configuration1.xMin); Serial.print(";"); Serial.print(configuration1.xMax); Serial.print(";"); Serial.print(configuration1.yMin); Serial.print(";"); Serial.print(configuration1.yMax); Serial.print("!"); } EEPROMAnything.h
#include <EEPROM.h> #include <Arduino.h> // for type definitions template <class T> int EEPROM_writeAnything(int ee, const T& value) { const byte* p = (const byte*)(const void*)&value; int i; for (i = 0; i < sizeof(value); i++) EEPROM.write(ee++, *p++); return i; } template <class T> int EEPROM_readAnything(int ee, T& value) { byte* p = (byte*)(void*)&value; int i; for (i = 0; i < sizeof(value); i++) *p++ = EEPROM.read(ee++); return i; }


